
The height of a chicken egg is barely 2 inches, and uh-huh, it's really fragile. To add on to the difficulty of this challenge, the chicken egg has its own unique shape and it will be really hard to use PP to alter it as it will only bend the PP and ultimately destroy it. Cutting the papers into strips aren't exactly useful either...
My original idea is to make a flower vase out of the egg shell, and each of the flower (I am not gonna use real flowers, I am not one person who will give TLC to these little lovelies.. so its best that I don't let them die/wither in my hands!... probably some new Prima flowers or chipboard flourishes from Maya Road would do the trick!) would serve as a frame for the photos. :) I got that inspiration from the MM Flower Patch ad in last month's Creating Keepsakes magazine. ;)
At first, I tried to glimmer mist the egg (!!). Haha, sounds ridiculous? :) Well, it sure is. As Glimmer Mist are all water-based and the egg shell is generally waterproof... so yeah, it was a failed attempt. But some of the glimmer coating got onto the egg even though the mist color is not very obvious, but oh well, better than nothing. ;(
Then, I tried to stick on some PPs stripes on the egg and obviously, 'cause of the odd shape, I can't do it. I tried to search for some 'flimsy materials' that will stick better on egg, and at last, my savior appeared! Guess that it is...
LACE! I think I must be the first person who put lace on an egg! Haha, sounds funny doesn't it? I am so giving this little egg here the baby chick treatment (you get the pun? :P). But unfortunately, as I was trying to put lace over the egg, I accidentally dropped my egg down the floor cause the lace was too long. :/ So um, it had a little crack there and it got more fragile.
Alas, when I tried to stick on the chipboard embellishment, the eggshell finally cracked open fully. (I guess I used too much pressure). I got disheartened after that but I realised that I could very well just get another bigger egg since the ones at home are honestly too small to work with. ;)
Here's a piccy of the lace w/ embellishments after the egg was thrown into the dustbin (byebye!):
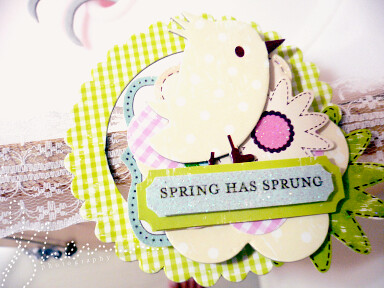
Ribbon: Lace (self-owned, bought in local art store)
Die-cuts: Making Memories
Dimensional Stickers: Making Memories
Chipboard elements: Making Memories
I'm sorry you've to see 5% of my creepy little toe in the above picture lol! As you can obviously tell, besides the lace that I used, the rest of the products are from Making Memories' easter line from last year, "Garden Party". :) Don't get me wrong, I love "Flower Patch" but I am still in the hoarding peroid with it and I just can't get myself to cut it out no matter what. Sad, I know.
Up next, I just gotta hollow out yet another egg and (hopefully) succeed in glimmer-misting that same egg. :) Also, I gotta dip my Maya Road flourishes in PP silver pixee stick for some shiny appeal. :) And then, I will attach the MM chipboard butterfly with a cut-out of an photo of Petrina onto the Maya Road flourishes and we will be done with the egg! I can't wait to show you guys what I am coming up with! :)
P.S: I'm on an online-shopping frenzy right now and would love to see some craft shops (preferably related to scrapbooking and fabrics :D) so I would love any recommendations my way. Also looking for some new thickers to play with! :D


No comments:
Post a Comment